
How to Apply Eyelash Extensions Step by Step for Beginners | Complete Guide
Eyelash extensions are one of the most popular beauty treatments for creating fuller, longer and more attractive lashes without applying mascara every day. If you are a beginner lash artist, learning how to apply eyelash extensions step by step is essential for achieving beautiful, comfortable and long-lasting results.
Whether you are starting your lash career or practicing at home on a mannequin, this complete guide from Luscious Glances will help you understand the basic eyelash extension application process, essential tools and important safety practices.
What Are Eyelash Extensions?
Eyelash extensions are lightweight synthetic or natural-looking fibers individually attached to natural eyelashes using a professional lash adhesive. Depending on the desired look, a client can choose from Classic, Hybrid, Volume, YY or Mega Volume eyelash extensions.
The correct lash length, thickness and curl should always be selected according to the client’s natural lashes and desired appearance.
Essential Tools for Eyelash Extension Application
Before starting an eyelash extension treatment, prepare all necessary tools:
- Eyelash extension trays
- Professional eyelash extension adhesive
- Isolation tweezers
- Volume or pickup tweezers
- Under-eye gel patches
- Lash tape
- Lash cleanser or foam cleanser
- Lash primer
- Micro applicators
- Glue stone or glue palette
- Disposable mascara brushes
- Lash mirror
- Mannequin head for practice
Clean tools and proper hygiene are extremely important because the eye area is sensitive and can be affected by contamination. The FDA recommends keeping eye-area cosmetics and instruments clean and stopping use if irritation occurs. (U.S. Food and Drug Administration)
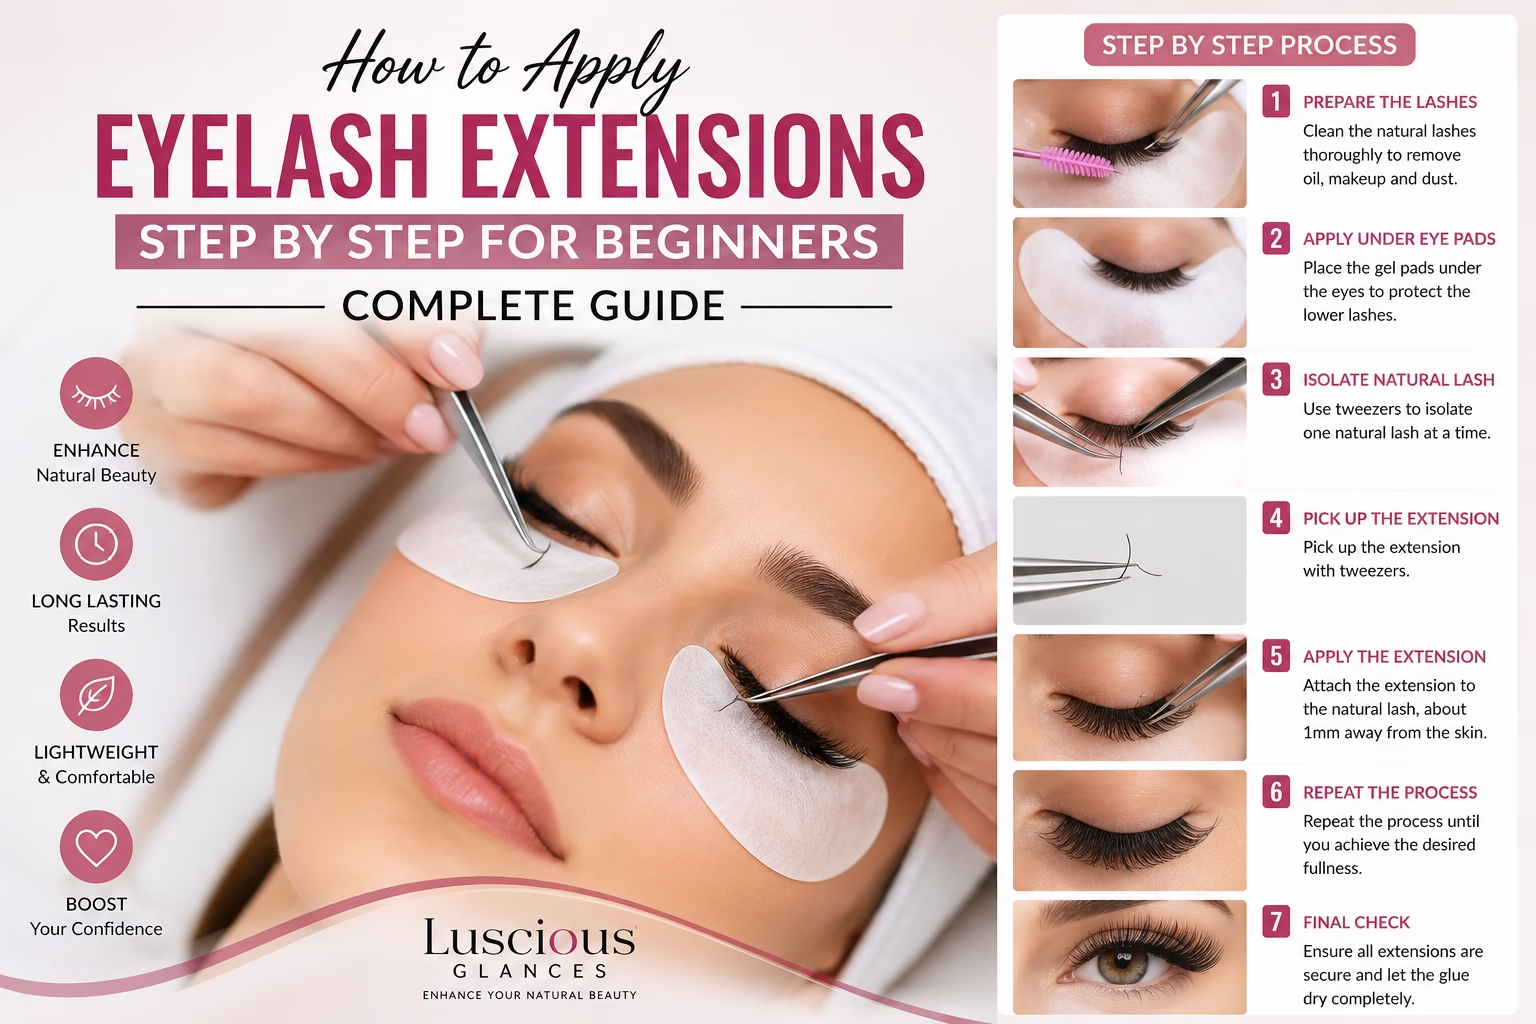
Step 1 Clean the Natural Lashes
Start by thoroughly cleansing the client’s natural eyelashes. Remove makeup, oil, dirt and residue using a suitable lash cleanser.
Clean lashes provide a better surface for adhesive bonding and can help improve retention.
Never begin the application when the client has an eye infection or inflamed skin around the eyes. (U.S. Food and Drug Administration)
Step 2 Prepare the Under-Eye Area
Ask the client to close their eyes comfortably. Carefully place under-eye gel patches below the lower lashes.
The lower lashes should remain completely separated from the upper lashes. Lash tape can be used carefully where necessary to secure stubborn lower lashes.
Make sure the patches are positioned comfortably and do not touch the eyeball.
Step 3 Choose the Correct Lash Extensions
Choosing the correct eyelash extension length, thickness and curl is one of the most important parts of the treatment.
For beginners, commonly used curls include:
- J Curl – subtle and natural
- B Curl – soft lift
- C Curl – popular natural-looking lift
- D Curl – dramatic curl
- L Curl – lifted appearance with a straighter base
Avoid choosing extensions that are too heavy or too long for the client’s natural lashes. A professional lash artist should prioritize the health and comfort of the natural lashes.
Step 4 Prepare Your Eyelash Extension Glue
Place a small amount of professional lash adhesive onto a glue palette or other suitable adhesive surface.
Check the adhesive manufacturer’s recommended drying time, humidity and temperature range before beginning.
Remember that eyelash extension adhesive is used close to a highly sensitive area. Always follow the manufacturer’s instructions and keep adhesive away from the eye itself. FDA guidance notes that eyelash extensions and their adhesives are cosmetic products and that the eyelid area can be particularly sensitive to irritation or allergic reactions. (U.S. Food and Drug Administration)
Step 5 Isolate One Natural Eyelash
This is one of the most important skills when learning how to apply eyelash extensions.
Using isolation tweezers, carefully separate one natural eyelash from the surrounding lashes.
Only one natural lash should be isolated before attaching an individual extension or appropriate lash fan.
Good isolation helps prevent lashes from sticking together and allows natural lashes to grow and shed normally.
Step 6 Pick Up the Eyelash Extension
Using your pickup tweezer, carefully pick up one extension from the lash strip.
For Classic lashes, select a single extension.
For Volume techniques, a properly created volume fan is attached according to the technique being used.
Avoid touching the extension excessively because oils or contamination can affect the bonding process.
Step 7 Dip the Lash Into Adhesive
Gently dip the base of the extension into a small amount of adhesive.
You don’t need excessive glue. Too much adhesive can create a heavy or messy appearance and may cause neighboring lashes to stick together.
The correct amount of adhesive depends on the technique, adhesive and experience level of the lash artist.
Step 8 Attach the Extension
Place the extension carefully onto the isolated natural lash while maintaining an appropriate distance from the eyelid.
The extension should follow the direction of the natural lash and sit neatly without twisting.
Do not attach an extension directly onto the skin or eyelid.
Step 9 Repeat the Process
Continue isolating, picking up and attaching extensions one lash at a time.
Work systematically across the eye rather than rushing.
As a beginner, focus on:
Isolation → Pickup → Adhesive → Placement → Separation
Good technique is more important than speed.
Step 10 Check for Stickies
After completing the application, carefully check the lashes for any extensions that have accidentally bonded to neighboring natural lashes.
Use clean tweezers to gently separate them.
This final check is essential for comfortable and professional-looking results.
Step 11 Complete the Final Check
Use a lash mirror to inspect the set from different angles.
Check:
- Lash direction
- Symmetry
- Adhesive buildup
- Stickies
- Coverage
- Client comfort
- Overall lash design
The finished lashes should look clean, balanced and comfortable.
Step 12 Explain Eyelash Extension Aftercare
Proper aftercare can help maintain the appearance of the lash set.
Advise clients to:
- Keep the lash area clean.
- Avoid rubbing or pulling the extensions.
- Use suitable lash-safe cleansing products.
- Brush the lashes gently when needed.
- Avoid picking at loose extensions.
- Return for professional maintenance as recommended by the lash artist.
If irritation occurs, the client should stop using the relevant cosmetic product and seek appropriate medical advice if irritation persists. (U.S. Food and Drug Administration)
Common Eyelash Extension Mistakes Beginners Should Avoid
1. Using Too Much Glue
More glue does not mean better retention. Excessive adhesive can create clumps and stick neighboring lashes together.
2. Poor Isolation
Incorrect isolation can cause multiple natural lashes to bond together, creating discomfort and interfering with natural lash growth.
3. Choosing Extensions That Are Too Heavy
Always consider the strength and condition of the client’s natural lashes before selecting length and thickness.
4. Working Without Proper Hygiene
Dirty tools, hands or products can increase the risk of contamination around the eyes. (U.S. Food and Drug Administration)
5. Rushing the Application
Beginners often focus on speed. Instead, concentrate on clean isolation, precise placement and consistent technique.
Classic vs Hybrid vs Volume Eyelash Extensions
Classic lashes: One extension is applied to one natural lash, creating a clean and natural appearance.
Hybrid lashes: A combination of Classic and Volume techniques provides a textured and fuller appearance.
Volume lashes: Multiple lightweight extensions are formed into fans and applied to individual natural lashes for a fuller look.
Choosing the right style depends on the client’s natural lashes, eye shape and desired result.
How Long Does Eyelash Extension Application Take?
The application time depends on the technique and experience of the lash artist.
A beginner may take longer because they are still developing isolation and placement skills. With consistent practice and proper training, application speed can improve without compromising quality.
Can Beginners Learn Eyelash Extensions?
Yes. Beginners can learn the fundamentals of eyelash extensions through professional training, supervised practice and consistent work on mannequin heads or practice lashes.
Before working on clients, practice:
Isolation → Lash Pickup → Adhesive Control → Placement → Direction → Separation
Building these fundamentals will help you develop better confidence and technique.
Why Choose Luscious Glances for Eyelash Extension Supplies?
At Luscious Glances, lash artists and beauty professionals can explore a wide range of eyelash extension products, including lash trays, adhesives, tweezers, cleansers, primers, removers and professional lash accessories.
Quality products combined with proper technique and training can help lash artists create consistent, beautiful results.
Final Thoughts
Learning how to apply eyelash extensions step by step requires patience, practice and attention to detail. From preparing the natural lashes and choosing the right extension to mastering isolation and adhesive control, every step plays an important role in achieving a professional finish.
If you are a beginner lash artist, don’t focus only on speed. Focus on clean isolation, correct placement, proper lash selection and client safety. With regular practice and professional guidance, you can develop the skills needed to create beautiful Classic, Hybrid and Volume lash sets.
Explore professional eyelash extension supplies from Luscious Glances and take your lash artistry to the next level.